How to Set Up Conversion Tracking With Stripe Checkout
 ContentPowered.com
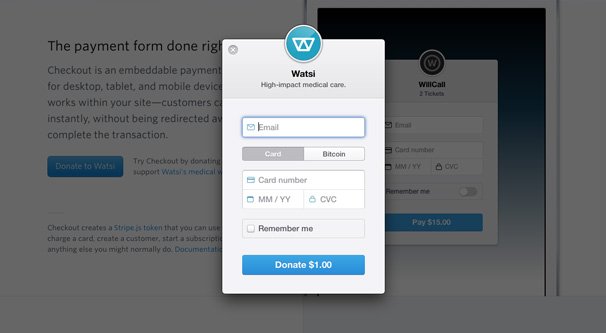
Stripe Checkout is one of many services provided by Stripe for ecommerce. Checkout specifically is a payment widget. You set it up on a product page, a cart page, or even a landing page. Customers can then enter their financial information – email and card information – and can pay immediately. It works on mobile, tablet, and the web.
One of the biggest benefits of using Stripe Checkout is their use of tokens. With their system, your servers never see the user’s card information, meaning there’s nothing for a potential hacker to steal. Security becomes much less of a burden.
How does it work? When a customer arrives on a page with the widget installed, the widget loads over HTTPS. The customer can then click to pay, fill out their information, and submit it. Checkout sends the payment information to Stripe directly, without touching your servers. Stripe then validates the card information and, if valid, sends a token back to Checkout. The token is submitted to your server, and your server uses the token to charge the card the appropriately authorized amount.
If you’re a developer looking to develop your own custom solution, I’ll leave you to it. You can read all of the Checkout documentation, including what information you can track and what you can’t, from this developer page. If you’re not a developer, I’ll try to give you a couple valid options for setting up conversion tracking.
Stripe Checkout has two types of integrations. The simple option is a basic pay with card option and keeps the script simple. It’s enough for many users, though if you want to track advanced data, you’ll need to use the custom option. Custom allows you to create a custom button and pass the Stripe token through a JavaScript callback. This is how you’ll use scripts and most forms of integration. It’s bulkier code, but it’s necessary to track data.
When you’re tracking conversions, remember that you need to have Stripe actually harvest the relevant data for you to track. Make sure to enable useful information like billing address, currency, and email so you can cross-reference your data with other sources of data in your ecommerce tracking.
It’s also worth noting a few quirks with Stripe Checkout. First of all, it needs to have HTTPS access. You need to have SSL on any page that is embedding the Stripe widget, to prevent man in the middle attacks. Card validation is performed with the credit card networks, but you can enable zip code verification as well if you want an additional layer of security. I recommend turning this on if you’re in a high risk industry or your business has a lot of attempts at fraud or charge-backs.
Google Analytics Event Tracking
Google Analytics is the default analytics system most of us use, right up until we run into limitations and want to switch to a potentially more robust, paid solution. As such, I’m listing the Google Analytics solution first.
This thread on Stack Overflow has all of the relevant code. Rather than copy and paste it here for you, I’ll guide you through understanding it.
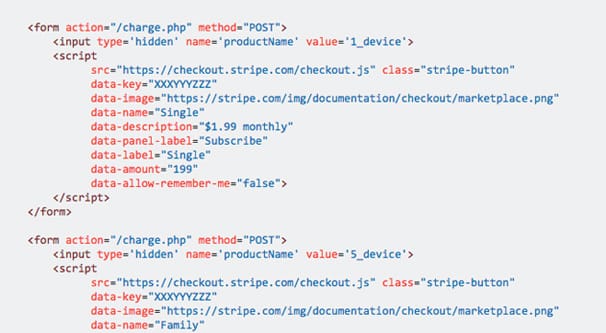
First of all, at the very top, we have this guy’s example of the Stripe Checkout code. You will, of course, want to be using your own version. The example version has a fake API key, a $1.99 recurring monthly subscription setup, and a larger family plan. It’s two versions of the checkout, when you likely only need one. Regardless, it’s a base; you’ll want to have your own version.
Below that you’ll see some more code from the top answerer. There’s a script at the top that adds a listener event called a click. The code specifies that the click has to be on the Stripe Checkout button.
What this code is doing is setting up a Google Analytics event to track when someone clicks on the checkout widget. The second block of code, then, is the list of data that is accessible from the click event. Below that is the full script for tracking the data. You can read more about the individual parameters and how they’re used in the Google Analytics documentation here.
This script can be placed anywhere on the page, since it only triggers when the user clicks on the checkout button. I recommend the footer, or at least lazy loading it. Otherwise, the script needs to finish loading, even if it doesn’t execute, before the page fully loads. It shouldn’t be a noticeable delay regardless, but there’s no reason to clutter your header if you can help it.
 5 Ways to Integrate Additional Payment Methods on Your… Having multiple available payment options is almost…
The flaw with this script is that it tracks when someone clicks the button to initiate payment. As we learned above, clicking the button generates a token from Stripe. If the payment information is declined, such as in the case of fraudulent information or a typo in the card number, there’s no failsafe. Your conversion tracking would record it as a conversion, while the actual widget reports a failure.
If you scroll a little further, to the second answer, you can find a script that solves this problem. The script here waits for the button to load, includes click tracking, and sends a second batch of code that pulls the event from Stripe, along with some error handling in case of issues with the payment. It’s up to you, of course, which option you want to use.
Zapier Automation
Zapier is one of those automation engines that links various APIs together in a way that can pass data from one to the other, without you needing to develop customized code or use another app you might not have. It’s like engineering a custom solution without needing to do the legwork.
This link takes you to their page on Stripe integrations. The relevant sections here are the triggers, primarily. You want to create a zap with a trigger that is relevant to your conversion tracking. Generally, this means the “new charge” trigger, so you aren’t accidentally eliminating repeat charges from returning customers. You can also track refunds, as negative conversions, if you want.

The link I gave you is a link to set up integrations with Google Analytics, assuming you’re still interested in using GA to track your conversions. Zapier’s power, though, is that you can set up those integrations with anything. The core Stripe page has a list of the various integrations you can use instead of Google Analytics, if you so desire. Some options include:
- Stripe and Gmail: Send new emails to new customers, or send yourself emails when new customers convert.
- Stripe and Google Sheets: Send new conversion information directly to a Google Sheet, to keep track of everything in one cloud-based spreadsheet.
- Stripe and MailChimp: Send emails to new Stripe conversions, or add new conversions to a mailing list for future newsletters and calls to action.
- Stripe and FreshBooks: Create new invoices or charge entries in FreshBooks whenever a new customer uses your Stripe Checkout.
There are, of course, a good number of other apps you can integrate if you want. Salesforce, Xero, QuickBooks Online, Infusionsoft, Shopify, Zendesk; these are all premium apps, meaning you will need to have a paid account with Zapier if you want to use them. Others, like Buffer, Asana, ShipStation, Trello, Knack, and Invoice Ninja are all available as non-premium apps. Choose the integrations that work with whatever system you’re already using.
If Zapier isn’t your thing, but you still want to use an engine similar to it, you can use others. IFTTT is the primary competitor, and they work with Stripe in many of the same ways. You can see their list of integrations here. Automate.io is another alternative, with many of the same integrations as the other two, seen here. Microsoft Flow exists as well, though they don’t currently have Stripe integrations.
Stripe Native Integrations
Stripe has a bunch of extensions on their site you can use natively, without having to go through a third party system. I didn’t put these up top because a lot of them aren’t actually relevant to conversion tracking, and you have to be using those systems already to be able to integrate them.

Regardless, here’s what you can do.
- GoDaddy Bookkeeping. Keep track of your finances, conversions, payments, and shipments through this one accounting integration option.
- Bench. Bench is a bookkeeping app that takes payment information directly from Stripe and lets you monitor your overall financial health, as long as you have Bench set up.
- Baremetrics. Another analytics suite, Stripe requires you to use Stripe Connect in addition to Checkout if you want to use all of this data. Stripe Connect allows historical data via webhooks, and a variety of metrics can be displayed in Baremetrics.
- Commerce Sync. This is a middleman app that connects Stripe directly to QuickBooks or to Xero. It transfers daily sales information, payment information, and bank feeds to help make your accounting easier.
- ChartMogul. With one-click Stripe integration, this app syncs billing data and allows you to generate reports on your conversions, your churn, your geographic representation, and other trends.
- Zoho Books. Zoho is another online accounting system with a lot of features to help automate workflows and so on. Stripe integration funnels customer information and receipts to your books.
- Slack. You can integrate with Slack to have a feed specifically for updates on invoices, payments, charges, transfers and any other Stripe-related events you want to see. Since Slack is an all-star app for small business teams, this is one of the more useful options.
- Hall Monitor. Hall Monitor is an overall business monitoring and workflow management platform. Linking it with Stripe allows it to import whatever payment metrics you want to keep track of.
- Swiftype Enterprise Search. This is an all-in-one app that links up with a lot of different apps, from Stripe to Zendesk and Dropbox, providing an overall business search. Useful for checking if a customer is new or recurring, but not great for tracking conversions on its own.
- HookFeed. This one is useful because it’s a real-time display of your metrics in one place. It helps build customer profiles using Stripe data and data from other sources you might have.
You get the idea. You can see the fill list – there are a few dozen more – on the Stripe Extensions page. They’re all freely available to use from Stripe’s end, you just have to be using the platform on your end, which can cost whatever the relevant platform happens to run.
So, as you can see, Stripe Checkout is pretty handy with how they present your data to you. You don’t get to see actual card information, for the sake of security, but you do get to see shipping and billing information for the users if you have it enabled.
Written by Kenny Novak

Kenny is an SEM and SEO professional. He uses blogging and content marketing as a launchpad for small businesses looking to grow their online presence.