How to Add a Tracking Pixel to Your Website in 5 Minutes
 ContentPowered.com
In the olden days, a tracking pixel was exactly that; a single real pixel. Ideally, it would be a 1px by 1px image of the same color as the background of whatever content you’re tracking. It could also be transparent.
The idea behind a tracking pixel is simple. You put it somewhere that you want to track, either the pageviews or something else reliant on loading the page. The user loads the page, and they load the tracking pixel. You then go into your server and see how many times people have downloaded your tracking pixel.
For example, you write an email newsletter and throw a couple of ads in. The owners of those ads want to see how many times their ads were seen, so they can determine metrics like click rates and conversion rates. You go to your server and run a query, and see that the pixel image has been downloaded by 15,000 unique IP addresses. That means you’ve put the newsletter in front of 15,000 people, and can report exactly that.
Now, there are all sorts of tracking pixels you can use these days. You can go the old fashioned route with the image, you can use code from various third parties, or you can use a script like the Facebook tracking pixel.
The Facebook Pixel is, in fact, a bit of JavaScript rather than a traditional image. It will look a little something like this. You can even see a bit at the bottom where it calls a specific secondary script that is more like a pixel, in case the user is using a noscript plugin that blocks the script. Note that there are two blank spots where I have removed ID numbers unique to the user, so you can’t use mine.
Thankfully, it’s a completely trivial process to actually create and install a pixel from Facebook. Any other system you choose to use will be at best exactly this complex, if not even simpler. If you’re using a non-Facebook pixel, it will work the same way, you just have to get your code from somewhere else.
I’ll be using the Facebook pixel as an example, but any other tracking pixel will work the same way, with only one variation; where you get the code. For example, if you want to be tracking AdWords conversions, you can use the Google Conversion Tag instead.
Step 1: Determine What Your Ad Objective Is
For Facebook tracking pixels, you need to determine your objective for the ads you want to run. What I’m talking about is the kind of objective you want that conversion to be. Here are a few examples.
- Getting people to sign up for your newsletter or email mailing list.
- Getting people to purchase a product that you fulfill on your website.
- Getting people to fill out a form to be contacted by your sales team.
- Getting people to download a digital product from your website.
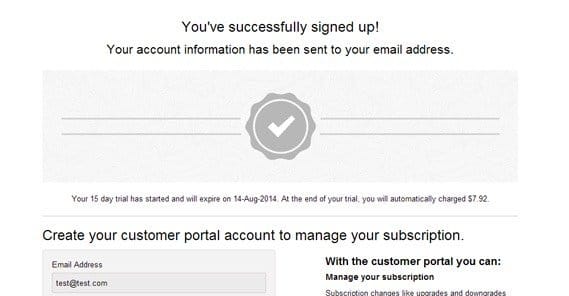
There is one thing in common with all of these objectives; they have a page on your site that works as a confirmation page.
![]()
This is distinct from something like, for example, an affiliate link. When a user clicks an affiliate link, in order for you to be paid, they need to convert. However, the confirmation of that conversion is a page on the site of the affiliate you linked to. It’s not a page you control, so it’s not a page you can track. The best you can do is track the people clicking on the link and rely on data from the affiliate for which of those clicks convert. Unfortunately, you’ll be unable to use any of your own conversion pixels to track people here.
Step 2: Determine What Page Indicates Conversion
Once you have some idea of what your process will count as a conversion, you need to figure out where you’re going to place the conversion pixel code. You will generally want this code to be present only on pages that show up when a user successfully converts, but which are impossible to see if you haven’t converted.
For example, using the examples above:
- Mailing list: A page after filling out their information where the user sees “thanks for subscribing!”
- Product purchase: The page at the end of the process where you give an order confirmation number is perfect.
- Sales lead: Same as a mailing list: any page that says something like “Thank you, our sales team will be in touch.”
- Digital download: The page where the user has to click a link to actually download the product, a confirmation number page, or any such paid-user-only page.
There are essentially two requirements for this page. First, the page needs to be visible only to the people who convert, but not to anyone else. If anyone can browse to the page, you’re going to get false positives on your conversion. Second, the page needs to be able to be edited by you. You need to insert the code into it somehow, right? For now we’re just talking about the normal, basic html editing CMS. If you need help or can’t access the pages on your own, talk to your developer to have them add the code.
Step 3: Generate Conversion Pixel Code
This process will vary from ad network to ad network.
On Facebook, you will need to go to the ads manager and click the drop-down arrow by your name. Find the “create ads” button and click it. Go to the menu – the three horizontal lines in the upper left – and click it. Find “Assets” and “pixels” under it, and click to create a new pixel. All you need to do is plug in a name and it will be created for you. You can then copy the pixel code into a .txt file, or email it to yourself or a developer email account.
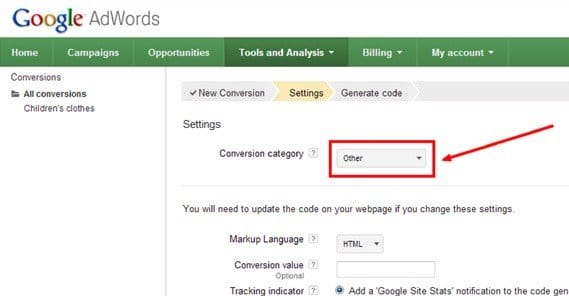
For Google AdWords, you will need to have set up conversion tracking according to this link. Once that is set up, you need to go into your settings menu and find “Install your tag.” Determine whether the conversion is a click or a page load, selection the appropriate option, and click to save the instructions and tag. This will give you the code similar to what you get from Facebook for their tracking.
 Can You Use Multiple Conversion Tracking Pixels on a Page? Tracking pixels are an extremely important component…
Other ad networks are going to hide their conversion tracking code in their own ways. You’ll have to consult with the documentation for whichever other networks you use to figure out their process.
Step 4: Find the Conversion Page
Remember how back in step 2 you determined which page on your site is going to be the successful conversion page. Now you need to find where in your actual website that page is located. For example, if your successful conversion page is www.example.com/storefront/payment/thank-you.htm, you will have your root directory, a subfolder called storefront, a folder within it called payment, and a file inside that folder labeled thank-you.htm. This is an insanely simplistic idea of how the conversion process actually works, but it’s an idea of what you’re looking for.
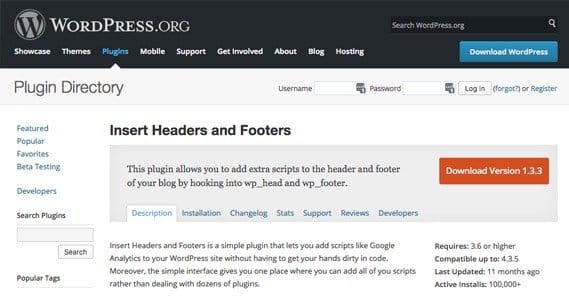
On a WordPress, there are a ton of different plugins that give you various levels of functionality for tracking pixels. For example, you can use the Facebook Conversion Pixel plugin, the Insert Headers and Footers option, or anything else of your choice.
Now, the Facebook tracking pixel – the new version – is designed to go on every page of your site, and specific event code will go on your conversion page. The process will be no different for installing it, you just need to be aware of what specifically you’re adding to the page.
Step 5: Install the Conversion Pixel
This step is actually going to have several sub-steps. At this point you know what file needs to have the code added, and you know what code needs to be added. Ideally, you have that code stored away in a text file somewhere, or at least pulled up in a web browser and ready to copy and paste. In any case, you need it accessible.
The first thing you need now is some way to download the file you need to change, and upload it again once it has been changed. This (traditionally) means using an FTP application. There are a lot of FTP clients out there, the earliest released in 1989. You really do have your pick. I like FileZilla myself, but SmartFTP, FireFTP, and WinSCP are all possible options. If you have a unique dev environment, you may need to talk to a developer to find out what they use and how to access your site. Of course, if you’re not able to access your site as it is, you’re probably not the one that should be adding this code in the first place.
Along with an FTP client, you need the username and password for your file server. Obviously, I don’t have access to those. You can usually find this information by logging in to your web host and finding their FTP settings. It won’t show you the password, but it will show you the username and protocol (FTP or SFTP) and will allow you to reset the password if necessary. If your host uses cPanel, you can find this in the FTP Accounts section under Files.
Now you need to use your FTP tool of choice – either your third party client, or even the file manager in cPanel – and browse to the location of the confirmation file you need to edit. Most of the time, this will be an htm or html file.
Download the file and save it locally on your computer, and then save a second copy of it as a backup. Keeping a backup is extremely important, in case you break something or install the code improperly. If you can’t fix the problem, you will need to restore from a backup. If you don’t have a backup, you suddenly end up needing a lot more time and support to fix your site. Backups are just good practice.
Next, open up your file. If it’s an HTM or HTML file, you can open it in notepad, Wordpad, Notepad++, Adobe Dreamweaver, or whatever editor you have installed in your development environment.
Now, different kinds of tracking code will require themselves to be placed in different locations. Facebook’s pixel, for example, wants to be right before the </head> tag in your file header. Google’s AdWords tracking wants to be in the <body> just below the opening tag, above the actual body content. Make sure you’re putting the code in the right place, or it might not run properly.
Now, save your file and open it up in a web browser – Edge, FireFox, Opera, Safari, Chrome, or what have you – and see if it looks good. If the page is obviously broken, you may not have pasted the code properly. Sometimes the page might rely on other local files to call data, like the CSS file, which will make the page look bad. Don’t worry about it if this is the case; uploading the file again will make it work fine.
Speaking of uploading, you need to go back to your FTP client and upload the changed file, overwriting the live file. This is why it’s important to have a backup; if something happens here, your website may not function properly, and you will need to replace the new file with the backup to maintain functionality while you figure out what went wrong.
Once the new version of the file is uploaded, your pixel should be active. Now all you need to do is move on to the last step.
Step 6: Verify the Pixel Functions
There’s one more step before you can consider this process complete: all you need to do is test the pixel to make sure it works. This is even simpler than installing it; all you need to do is perform the action that the pixel is supposed to track. Then go into whatever ads system you’re using and see if the action was tracked. If so, success!
Written by James Parsons


Sulit.PH
says:What is the pros and cons of embeding pixel on website VS enabling it on a link?