How to Generate a Cloaked Shortened Link for Clickbank
 ContentPowered.com
One of the big problems with affiliate marketing is how often people are skeptical about links or avoid them altogether. People learn that something that points to Clickbank is going to be monetized, and they don’t want to feel pressured into a sale. Some sites don’t like people trying to monetize through them, as well, so various comments sections, communities, and groups will ban links to certain domains.
It’s not much better to just use a URL shortener like bit.ly. There are two problems with that. The first is that people tend to be skeptical of shortlinks as well. They figure that if you aren’t posting the full URL, you have something to hide. This goes all the way back to the early days of URL shorteners, where 90% of their usage was to hide something either monetized or malicious. Bit.ly actually maintains a list of domains and keywords they won’t allow through their system, and some sites like Twitter will block URL shorteners that are known to host malicious content.
The second problem is that there are URL un-shorteners that reverse the process. Anyone willing to visit a site like urlex.org will be able to peek behind your shortened URL and see your secrets. Some people even use browser plugins that automatically replace shortlinks with their full length brethren in the content they read.
There’s also the ongoing problem that some sites will ban shortlinks as well, so using a shortlink to get around monetization link bans doesn’t help anything.
The best way around all of this is to create a custom shortlink. If you don’t know what I’m talking about, just visit something like the deals page from ShoutMeLoud. If you click any of the “get now” links you’ll be taken to blog posts about the subject, which serve as excellent landing pages. Any of the links on those pages, meanwhile, are affiliate links. They have URL structures like shoutmeloud.com/recommended/tubebuddy. Clicking that link redirects the user to tubebuddy.com/Shout, which is their affiliate code. That URL might be banned or filtered, but the shoutmeloud.com domain one wouldn’t be.
It’s not really a shorter link, but that’s fine. In almost every situation, a short link is no longer necessary. They were initially created for space-saving on sites like Twitter, but Twitter automatically runs everything through t.co these days, so you don’t need to worry about taking up too much space with links. The same goes for most other places. Plus, the URL structure is completely under your control with a method like this. You don’t have to do /recommended/fullsitename. You can use /rec/initials, or anything as short as you like. The point is, it comes form your site and your domain, and uses a redirect to apply your referral code.
There’s another important benefit to this structure. If you had a referral code for site A that was example.com/?refid=3259084033, and you share that link everywhere, what happens if you no longer want to recommend that site? What happens if that site rebrands and doesn’t redirect their old codes? What happens if your referral code changes? In all of these situations, you would have to search every place you put that referral link and change it. In some cases you may have put it in places you can’t edit, so your old link languishes, unable to earn you money.
With the URL structure that filters through your site, you can change the code in the background – the redirect – without having to hunt down every instance of the link you’ve ever posted. You can easily change a referral code, a UTM parameter, or anything else just by changing one bit of code.
So how do you go about setting this all up? Well, first of all, you need to be hosting the site yourself with your own design. If you want to do this with WordPress, for example, you’ll have to find a plugin that allows it. They do exist, but they aren’t the focus of this post. This post is all about how you can cloak links to make it easier to promote Clickbank and other affiliate links.
Step 1: Create the Folder
The first thing you want to do is create your outbound folder. This is the example.com/rec/ folder, or ShoutMeLoud’s /recommended/ folder. It should be in your root directory, so right after the .com or whatever TLD you use. Just click to add a new folder.
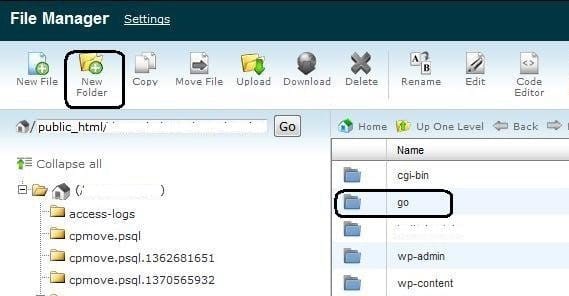
If you prefer, you can add more than one folder. Nothing stops you from having one folder for each affiliate network, or different folders for different niches. You’ll be complicating the work a little because each folder will need its own script, but it’s still a matter of copy and paste with a few changed lines. Easy, no matter which route you take.
I recommend keeping your folder name short if you want to use this as a shortlink. You could use /rec/ or /ref, you could use /out/ for outbound links, or /go/ or whatever you want. It doesn’t even need to be a word or abbreviation, though it’s generally better for usability if there’s something human readable there. If you’re just making letter/number word salad, people will be just as skeptical of it as they are of referral links or shortlinks.
Step 2: Hide the Folder
Now, if that folder is suddenly available for all to see, the illusion breaks. If people can just waltz in and see all of your scripts, they can tell there’s something going on, even if most of them won’t know what to make of the code.
The real enemy here is Google, however. You don’t want this folder indexed and able to appear in the search results. There’s nothing malicious going on, but Google inherently doesn’t really like redirection scripts and cloaked links, so it might hurt you a little overall.
Thankfully, blocking it is quite easy. If you have a robots.txt file in your root directory, open it. If you don’t, just make a new document in notepad and name it robots.txt. In this file, put the lines:
User-agent: *
Disallow: /out/
In this case, the /out/ is whatever you named the folder in step one. If you made more than one folder, add it in another Disallow: /folder/ line. It should be pretty easy to set this file up.
 The Pros and Cons of Using Shortened URLs in Your Ads Using a shorter URL with your ads…

You may see a few additional lines if you’ve had this file made before. You may see folders disallowed like /tmp/ o r/cgi-bin/. These are fine to leave as they are; they are just system folders that you don’t want people finding anyways. Google is generally smart enough to not index them by default, but it’s good to have that extra protection just in case. If nothing else, a hacker casually glancing at your robots.txt file will use that as an indication that you have at least some inclination to security rather than none at all.
The main thing to watch out for is to never type “Disallow: /” in your robots.txt file. You can’t be clever and set up a blank entry for later, or anything like that. The single / indicates the root directory. This tells Google that everything on www.example.com/ should be disallowed. In other words, it blocks your entire site from the search index.
Step 3: Add a Dash of PHP
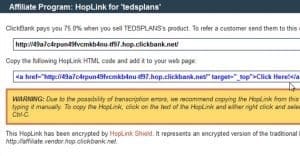
PHP is a coding language and it may seem intimidating if you don’t know what you’re doing, but it’s okay. There are a lot of PHP devs out there who can provide these scripts for you. One of the easiest to use is Joost de Valk’s script set, found here.
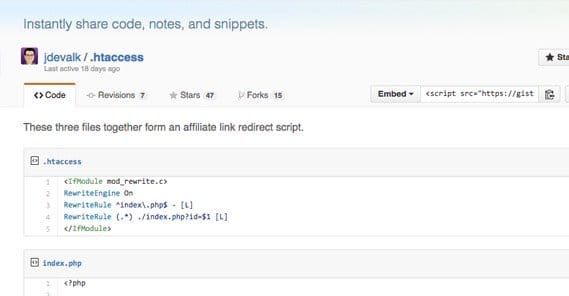
In this gist page on github, you will find three files. One is the .htaccess file with five lines of code. One is the index.php file that has 34 lines, which is where the meat of the redirect scripting goes on. The third is redirects.txt, which is an example file that you’ll be able to edit to add your links. The code is all well commented, and there’s a lot of help and support on the page. Even though it’s three years old at this point, the method hasn’t changed, and the code will still work.
All three of these files will go in your root directory, the same as the robots.txt file. You shouldn’t have to edit the .htaccess file or the index.php file at all, though if you have an existing .htaccess file on your site, you may have to merge the two.
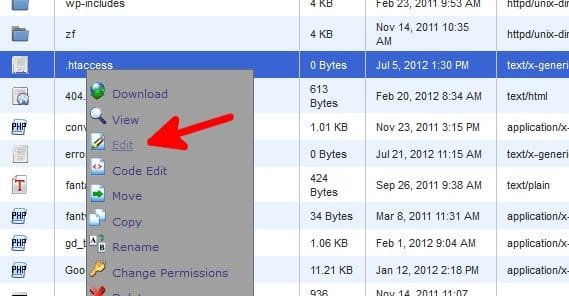
Step 4: Edit the Redirects.txt File
The example redirects.txt file Joost gives looks like this:
default,http://example.com
yoast,http://yoast.com
test,http://yoast.com/?p=2
These are three entries. Each one of them is two pieces of data.
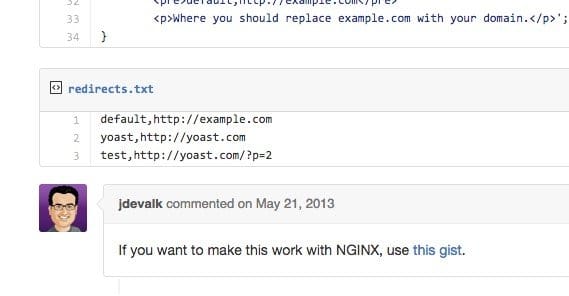
The first is the identifier for the redirect URL, and the second is the destination URL. This is what allows your redirect URLs to function. For example, if you want www.yoursite.com/out/clickbankoffer3 to redirect to your clickbank.com/offer3?refid=318974981234, or whatever your referral ID URL happens to be, you would want to make a new entry. The first part of the entry would be the final part of your URL, the clickbankoffer3 bit. The second bit is the referral URL, so the clickbank URL I made up above. They will be separated by a comma, just like in the example, so:
clickbankoffer3,http://clickbank.com/offer3?refid=318974981234
Of the three entries in the existing file when you get it, two of them don’t matter. Those are test and yoast. You can delete those safely. Replace them with any referral URL you want, such as the clickbank offer example.
The default,example.com entry should stay, but be modified. Replace the http://example.com URL with the URL of your homepage. This makes it so that any time a referral URL breaks or otherwise doesn’t work, your users are redirected to your homepage rather than to a broken page, a 404, or the front page of Clickbank.
Step 5: Use Your New Links
Now that you’ve gotten the code all set up, it’s time to start making your redirect URLs. It’s not a hard process, but you’ll need to do it each time you have an offer you want to promote.
- Go to Clickbank and enroll in an offer.
- Generate a referral URL for that offer.
- Make a new entry in your redirects.txt file that has the short name you want to use as the ID, and the URL of the referral offer after the comma, just as the above example.
- Use the www.yoursite.com/out/yourID URL when you’re linking out. People will see that the URL is on your site and will be more confident in clicking it than they would be otherwise.
Now any time you want to add a new affiliate link, you can do so in the same way. Whenever you want to change one, all you need to do is edit the corresponding entry in the redirects.txt file. It’s all quite simple and easy.
You might wonder what the .htaccess file does for you here. The main point of it is to remove the ?id= bit from the redirect URLs. It turns your sitename.com/out/?id=clickbank3 into sitename.com/out/clickbank3. It’s one more step towards hiding the cloaking scripts, and it makes your links much more Google-friendly.
The WordPress Way
If you’re using WordPress as a blog system, you can’t implement these scripts very easily. Thankfully, you can use a plugin to do the same thing for you. Something like Simple URLs is essentially this script in plugin format. IT creates the redirects, it allows you to choose the URL you want to display, and it allows you to plug in the redirected URL. It’s a very simple and easy to use plugin.
There are other plugins that do the same thing, as well. WP Shorties adds click tracking, though it’s an out of date plugin that hasn’t been updated in over two years, which is why I’m not linking to it. I always recommend using recently updated plugins, because that way you know the developer is on top of things fixing bugs and potential security issues.
You can also use something like Pretty Link Pro, which will give you even more functionality, including shortlinks in addition to cloaking, organization, sharing, and tracking. It’s going to be $47 for the blogger edition, which works on a single website. For more than one website you need the developer edition at $97. Up to you to decide if the benefits are worth it.